GROUP NAME: THE THROUGH THREE
The J2EE Application Concept:
- SERVLETS:
A servlet is a Java programming language class that is used to extend the capabilities of servers that host applications accessed by means of a request-response programming model. Although servlets can respond to any type of request, they are commonly used to extend the applications hosted by web servers. For such applications, Java Servlet technology defines HTTP-specific servlet classes.
The javax.servlet and javax.servlet.http packages provide interfaces and classes for writing servlets. All servlets must implement the Servlet interface, which defines life-cycle methods. When implementing a generic service, you can use or extend the GenericServlet class provided with the Java Servlet API. The HttpServlet class provides methods, such as doGet and doPost, for handling HTTP-specific services.
The servlet will forward the request and response into a JSP view. The getRequestDispatcher() method in the servlet class takes the path of the JSP file as the argument.
JSF (Java Server Face):
These are JavaServer Page including JavaServer Face tags (which are similar to JSTL tags). In addition, JSF allows the definition of navigation models between pages (something similar to Spring web flow). It also includes Facelets.
JSF provides special tags to create common layout for a web application called facelets tags. These tags provide flexibility to manage common parts of multiple pages at one place.
For these tags, you need to use the following namespaces of URI in html node.
<html
   xmlns = "http://www.w3.org/1999/xhtml"
   xmlns:ui = "http://java.sun.com/jsf/facelets"
>
Following are important Facelets Tags in JSF 2.0.
| S.No | Tag & Description |
|---|---|
| 1 | Templates
We'll demonstrate how to use templates using the following tags
|
| 2 | Parameters
We'll demonstrate how to pass parameters to a template file using the following tag
|
| 3 | Custom
We'll demonstrate how to create custom tags
|
| 4 | Remove
We'll demonstrate capability to remove JSF code from generated HTML page
|

- Choose File > New Project (Ctrl-Shift-N; ⌘-Shift-N on Mac) from the main menu.
- Select Web Application from the Java Web category and click Next.
- Type SimpleEE6App for the project name and set the project location.
- Deselect the Use Dedicated Folder option, if selected. Click Next.
(For this tutorial there is little reason to copy project libraries to a dedicated folder because you will not need to share libraries with other users or projects.)
- Select the GlassFish server and set the Java EE Version to Java EE 6 Web or Java EE 7 Web. Click Next.
(For this tutorial there is little reason to copy project libraries to a dedicated folder because you will not need to share libraries with other users or projects.)

6. Select JavaServer Faces in the Frameworks pane. Click Finish.
By default, the IDE will select the JSF 2.x library if you are developing a Java EE web application and deploying to the GlassFish server. The version of the default JSF library depends on the version bundled with your GlassFish server. The JSF 2.x library enables you to use Facelets as the page language and also provides support for JSF 1.2 and JSP.

When you click Finish, the IDE creates the project and opens the project in the Projects window. The IDE automatically creates the page index.xhtml and opens the page in the editor.
Using Java Persistence API for Java SE 7 Desktop applications in NetBeans 7
Purpose
This tutorial demonstrates setting up Java Persistence API for Java SE 7 desktop applications in NetBeans 7.
Time to Complete
Approximately 30 minutes.
Overview
The Java Persistence API(JPA) provides an object/relational mapping facility for managing relational data in Java applications. JPA is a lightweight, POJO-based framework for object-relational mapping. The mapping between Java objects and a relational database is done using annotations and/or XML deployment descriptors. Though JPA is a part of EJB 3 Specification it can be used in Java SE applications, outside of the Java EE environment .
In this tutorial, you will create and configure a persistent Unit using JPA. You will
- Create a database connection
- Generate Entity classes for tables in the database
- Persist data in the database using Entity classes
Software and Hardware Requirements
The following is a list of software requirements:
Prerequisites
- Before starting this tutorial, you should have the software installed as listed under Software Requirements.
- NetBeans is running.
- Download and unzip the files.zip file that contains the file you need to perform this tutorial.
Creating a database connection
Java DB database server is part of NetBeans. We will use Java DB as the database server . The following steps demonstrate creating the database playerDB.
| 1 . | To start the Java DB Database from NetBeans, perform the following steps. a. Click Services tab. b. Expand Databases node. c. Right-click Java DB icon. d. Select Start Server.  Note the following output in the Output window, indicating that the DB server has started:  Note that the DBserver version could vary from the version shown in the screenshot depending on the JDK build updates. |
|---|---|
| 2. | To create playerDB database, perform the following steps: a. Right-click Java DB icon, select Create Database.  b. Enter the following information for the database: Database Name: playerDBc. Click OK.  This creates the database and adds a connection for the database under the Databases icon.  |
| 3 . | To connect to the newly created database playerDB, perform the following steps : a. Right-click jdbc:derby://localhost:1527/playerDB connection. b. Select Connect.  |
| 4. | Create tables and populate them with data in playerDB database. a. In NetBeans select File > Open File .  b. In the file browser navigate to the directory, where you unzipped the files from the Prerequisites section and select playersDB.sql c. Click Open. The script automatically opens in the SQL Editor.  d. Select jdbc:derby://localhost:1527/playerDB in Connection drop-down box in the SQL Editor toolbar. e. Click the Run SQL icon to execute the SQL statement.  |
| 5. | Examine the contents of the database. a. In the Services window, expand the jdbc:derby://localhost:1527/playerDB connection under the Databases node. b. Right-click the connection and select Refresh. c. Expand the FRED schema. You see the nodes for the Tables, Views, and Procedures.  d. Expand the Tables node to see the PLAYER, TEAM tables.  e. Right-click PLAYER table node and select View Data.  f. A SQL command window opens and executes an SQL command to display the data in the table.  g. Repeat the previous step for the TEAM table. g. Repeat the previous step for the TEAM table. |
Generating Entity Classes from Database
The Java Persistence API requires that you identify the classes that you will store in a database. The API uses the term entity to define classes that it will map to a relational database. You identify persistable entities and define their relationships using annotations. An entity represents a table in a relational database. Each entity instance corresponds to a row in the table. An Entity is coded as a POJO.
| 1. | Create new Java Project .Select File > New Project . |
|---|---|
| 2. | Select Java from the Categories column and Java Application from the Projects column and then click Next. |
| 3. | Perform the following steps: a. Name the project PersistenceDemo. b. Uncheck the Create Main Class check box. c. Click Finish  |
| 4. | Right-click PersistenceDemo Project and select New > Entity Classes From Database. |
| 5. | Enter the following information to create Entity classes: a. In the Database Connection field select jdbc:derby://localhost:1527/playerDB[Fred on FRED] from the drop-down.  b. You see PLAYER and TEAM tables in Available Tables category c. Click Add All  d. You see both the tables PLAYER and TEAM in Selected Tables Category e. Click Next  |
| 6. | In the Entity classes Window, enter the Package Name as demo and click Next. |
| 7. | In the Mappings Window, click Finish with default selection. |
| 8. | Verify the creation of Entity Classes. a. Select the PersistentDemo Project. b. Expand the demo package, you see Team.java and Player.java created.  The above set of entities created in the application is called a persistence unit. Persistence units are configured in an XML file placed in the META-INF folder. It is used to specify the persistence provider name, entity class names and properties like the database connection URL, driver, user, password.  |
| 9. | Name the Persistence Unit name as PersistenceDemoPU in the persistence.xml file. a. Right-click persistence.xml and select Open to view it in the code editor window.  b. Select Source tab . c. Verify the name of persistence Unit is PersistenceDemoPU as shown below.  |
Implementing CRUD operations using JPA
Entity objects are in-memory instances of entity classes which represent physical objects in the database. In JPA you can use entity objects for many operations, including Creating , Retrieving, Updating and Deleting database objects. We need three artifacts to implement the CRUD operations using JPA:
1. An Entity class
2. A persistence.xml file
3. A class (or client) through which we insert, update or find an entity.
2. A persistence.xml file
3. A class (or client) through which we insert, update or find an entity.
The following section demonstrates Create operation, to persist Player entity objects into playerDB database. The Entity class, Player.java contains the mappings to the table, PLAYER in the form of annotations.
Create Operation
| 1 . | To create the client program CreatePlayers.java, perform the following steps: a. Right-click PersistenceDemo project and select New > Java Class.  b. Save the class as CreatePlayers and select package name as demo.  c. Click Finish. d. Right-click CreatePlayers.java and select Open to view it in the code editor window.  |
|---|---|
| 2 . | Import the following classes: import javax.persistence.EntityManager; import javax.persistence.EntityManagerFactory; import javax.persistence.Persistence;  |
| 3 . | Create main method in the class and add the following lines of code. public static void main(String[] args) { EntityManagerFactory emf = Persistence.createEntityManagerFactory("PersistenceDemoPU"); EntityManager em = emf.createEntityManager(); }  The above code demonstrates creation of an EntityManager instance. To persist a new entity, you need an EntityManager instance. EntityManagerFactory is a factory for creating an EntityManager. EntityManager manages entities and it is responsible for their addition, updating and deletion. Since EntityManager instances represent a persistence unit, you must provide the persistence unit name. In this example PersistenceDemoPU is the persistence unit name which is declared in the persistence.xml file along with other properties. |
| 4 . | Add below code to the main method. em.getTransaction().begin(); Player p1 = new Player(); p1.setId(5); p1.setFirstname("Ian"); p1.setJerseynumber(30); p1.setLastname("Thorpe"); p1.setLastspokenwords("I am in the best form"); em.persist(p1); Player p2 = new Player(); p2.setId(6); p2.setFirstname("Deigo"); p2.setJerseynumber(40); p2.setLastname("Maradona"); p2.setLastspokenwords("I will be back"); em.persist(p2); em.getTransaction().commit(); em.close(); emf.close(); The above code creates a transcation, 2 objects of the Player class which is persisted as 2 rows in the Player Table.  |
| 5 . | Add the Java DB client jar to connect to the Java DB database server. Complete the following steps: 1) Right-click Project > Project Properties> Libraries. 2) Select Add JAR/Folder.  3) Browse to C:\Program Files\Java\jdk1.7.0_01\db\lib\derbyclient.jar 4) Click Open > Click OK.  |
| 6 . | In the Projects window, right-click CreatePlayers.java and select Run File from the right-click menu. |
| 7 . | Verify the output. Examine the contents of the database. a. In the Services window, expand the jdbc:derby://localhost:1527/playerDB connection under the Databases node. b. Right-click the connection and select Refresh. c. Expand the FRED schema > Expand Tables Node >PLAYER Table. d. Right-click PLAYER table node and select View Data. You see the the 2 rows inserted in the PLAYER table.  |
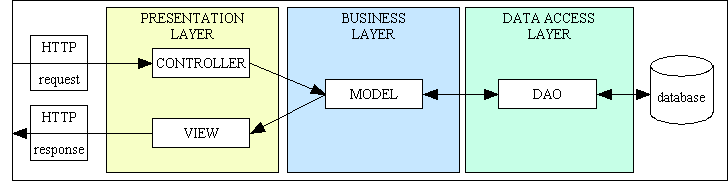
The Model View Controller Software Design Pattern and the
3 Tier Application:
Model–view–controller is an architectural pattern commonly used for developing user interfaces that divides an application into three interconnected parts. This is done to separate internal representations of information from the ways information is presented to and accepted from the user.

Components:
- The model is the central component of the pattern. It is the application's dynamic data structure, independent of the user interface.It directly manages the data, logic and rules of the application.
- A view can be any output representation of information, such as a chart or a diagram. Multiple views of the same information are possible, such as a bar chart for management and a tabular view for accountants.
- The third part or section, the controller, accepts input and converts it to commands for the model or view.
Why Is Model-View-Controller So Important?
- The MVC architectural pattern is not directly related to web applications or Java for that matter. In fact, it’s quite common in Smalltalk applications, which generally have nothing to do with the Web.
- As we saw in the previous section, the Model 2 approach is concerned with separating responsibilities in web applications. Allowing a JSP page to handle the responsibilities of receiving the request, executing some business logic, and then determining the next view to display can make for an unattractive JSP page, not to mention the maintenance and extensibility problems this entanglement causes.

